
Research Article
Austin J Radiol. 2015; 2(7): 1038.
Assessment of Some Selected Conventional Diagnostic X-Ray Facilities at Cape-Coast in the Central Region of Ghana
Owusu-Banahene J¹*, Amoako G², Owusu I¹, Baffour Awuah³ and Darko EO¹
¹Radiation Protection Institute, Ghana Atomic Energy Commission, Ghana
²Department of Physics, University of Cape Coast, Ghana
³KomfoAnokye Teaching Hospital, Ghana
*Corresponding author: Owusu-Banahene J, Radiation Protection Institute, Ghana Atomic Energy Commission, P.O.Box LG 80, Legon-Accra, Ghana
Received: July 08, 2015; Accepted: September 11,, 2015; Published: September 29, 2015
Abstract
The aim of the present paper is to assess some of the factors affecting on quality assurance of some conventional X-ray facilities such as reproducibility of tube voltage, dose output, X-ray tube consistency, accuracy of kVp, and half value layer. Examinations of these factors were studied using noninvasive kV meter of RMI 24A Multi-function meter. The quality assurance tests of X-ray diagnostic examination are measured and compared with the international tolerance. The half value layer of the radiation beam is an essential component of the assessment program. It is a measure of the beam hardness which relates to the type and thickness of shielding required in the facility and it also determines to a reasonable extent how much soft radiation is present in a beam. This soft radiation is absorbed in the surface tissue and results in unnecessary radiation being absorbed by the patient. In addition, it also contributes to unnecessary scatter within the patient which detracts from the desired image. The half value layer of a machine should not change for the lifetime of a machine unless someone removes the filter and as such it should be measured at least during the installation of a new machine.
Keywords: X-rays; Quality assurance; Half value layer; Radiation beam and examination
Introduction
In 1895 Wilhelm Rontgen was studying the effects of cathode rays passing through various materials and noticed a nearby phosphorescent screen glowing vividly in the darkened room. Rontgen soon realized he was observing a new kind of ray, one that, unlike cathode rays, was unaffected by magnetic fields and was far more penetrating than cathode rays bombarding the glass walls of his vacuum tube. Rontgen studied their transmission through many materials and even showed that he could obtain an image of the bones in a hand when the X-rays were allowed to pass through. This experiment created tremendous excitement, and medical applications of X-rays were quickly developed and still used today.
X-rays play an important role in modern technology, especially in the field of medical imaging purposes and treatments. Medical sources of ionizing radiation are the largest contributor of radiation doses from artificial sources and most of this radiation comes from diagnostic X-rays [1-3]. X-rays are produced when electrons strike or hit a metal targets.
The main goal of quality assurance of X-ray machine is to obtain accurate and timely diagnosis. The secondary goals are minimization of radiation exposure and to obtain high image quality. This can be assessed by testing the X-ray machine’s optimum operating parameters such as reproducibility of tube voltage, dose output, time , X-ray tube efficiency , accuracy of kVp , mA, time, focal spot size and half value layer [4,5].
An adequate diagnostic Quality Assurance (QA) program involves periodic checks of the components in a diagnostic X-ray imaging system. The optimum QA program for any individual facility will depend on a number of factors which include but may not be necessarily be limited to, items such as the type of procedures performed, type of equipment utilized, and patient workload. The quality assurances of diagnostic X-ray are based on the Basic Safety Standard –BSS [4] and International Commission of Radiological Protection, for the use of Diagnostic Reference Levels (DRL for patients, ICRP- Report No. 1966 [2,6].
For the purposes of this test procedure like the kVp test, accuracy will mean the degree of agreement between the measured and indicated kVp values. The X-ray kVp is the most critical. A small error of this variation will have a greater effect on the final radiographic image.
The beam quality test verifies that the Half-Value Layer (HVL) is sufficient to reduce patient exposure to low-energy radiation and assures that filters, which may have been removed for tube inspection, are in place for normal radiography [7-9].
In this study, the various tests were performed in diagnostic X- ray facilities for image quality by using appropriate equipment. Image quality and patient dose are dependent on any variation in the generator kilo Voltage (kV) of the X-ray set. Therefore an accurate kV calibration is always required [10-14].
The aim of this paper is to assess some factors affecting the quality assurance of conventional X-ray machines such as reproducibility of tube voltage, dose output , accuracy of kVp , and half value layer or radiation beam quality.
Material and Method
The assessment was performed using a checklist developed by the Radiation Protection Board of Ghana Atomic Energy Commission which lists the general radiation provision such as radiation warning light, shielding, protective clothing, output consistency and beam quality.
The following parameters were tested for at the selected X-ray facilities: kVp accuracy and reproducibility, beam quality, beam collimation and alignment and the radiation dose output consistency. The RMI 241 meter was used to measure the kVp and timer accuracy; and the Red check was used to measure the radiation output consistency and the Half Value Layer (HVL) by using aluminum absorbers or filters. The beam alignment and collimation test was done using the collimator and beam alignment tools.
The kilovoltage (kVp) accuracy test
Firstly the RMI meter was set at a distance of 100 cm from the X-ray tube focus and was centered using the laser. Then 20mAswas set on the machine control panel. The kVp was then measured from 60-120 kVp in increment of 10. At every set kVp on the control panel, the measured kVp was recorded. The percentage difference between the kVp set on the control panel and measured kVp values were calculated. This should be within ± 6% for acceptance (Figure 1).
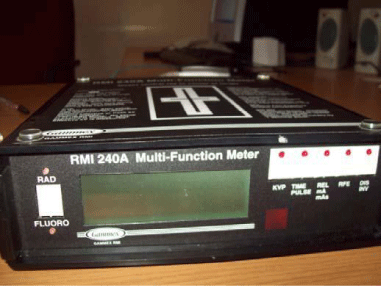
Figure 1: RMI Multi -functional meter.
Tube output measurement
This test checks that the radiation output [mGy/mAs] remains constant as the mA is varied. For this test, the dose Victoreen Red check Plus meter was used as shown in Figure 2.
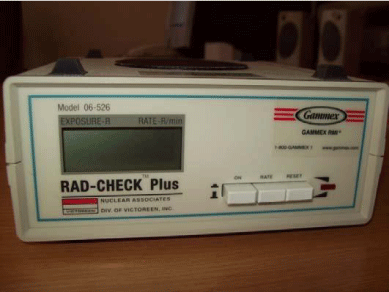
Figure 2: Rad Check Plus meter.
Half value layer (HVL) measurement
The half-value layer measures the quality of the X-ray beam. The apparatus used are the Aluminum (Al) attenuator set, Victoreen Rad Check Plus meter and lead vinyl. The meter was placed at 100 cm from the tube focus on the lead vinyl to standardize backscatter. The kVp was set at 80 and fixed value of 20mAs. The X-ray beam was collimated to the size of the meter. Three exposures were taken and the resulting doses were recorded. Another set of exposures and dose measurements were taken after placing a 1.0mm thick Al attenuator on the collimated area of the Rad Check Plus meter. Further exposures and dosage measurements were taken for after adding varying thicknesses of Al attenuators until the dose has fell to below 50% of the initial unattenuated value.
A graph with the dose against the aluminum attenuator thickness was then plotted. From thegraph, the thickness of Al required to reduce the unattenuatted dose by 50% is the Half ValueLayer (HVL) of the radiation beam.
Mathematically, the HVL could also be determined by using the relation (Figure 3).

Figure 3: A set of Aluminum absorbers.
(1)
Where μ is the linear attenuation coefficient.
Beam collimation
The following apparatus were used: beam alignment tool as shown in Figure 4, collimator tool shown in Figure 5, cassette and film.

Figure 4: Beam alignment tool.
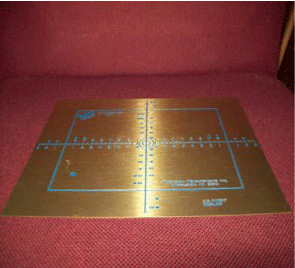
Figure 5: Collimator tool.
The collimator tool was placed at a distance of 100cm from the tube focus with a cassette loaded with a radiographic film placed underneath. The beam alignment tool was then placed at the center on the collimator tool. The collimator shutters were adjusted so that the edges of the light field coincide with the rectangular outline on the collimator tool. Then the cassette was exposed and later the film was developed to visualize the image produced.
If the X-ray field falls just within the image of the rectangular frame there is good alignment. If an edge of the X-ray field falls on the first spot, ± 1.0cm, on either side of the line it shows that the edges of the X-ray field are misaligned by a percentage of 1% (Figure 6,7,8).
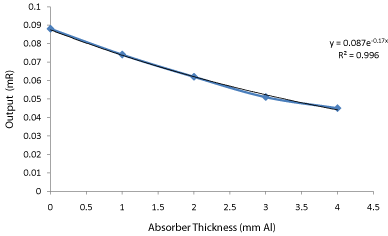
    Figure 6:  A graph showing the variation of absorber thickness and output
for Case 1.
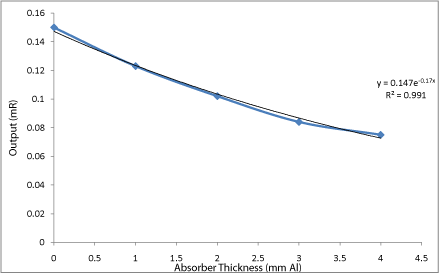
    Figure 7:  A graph showing the variation of absorber thickness and output
for Case 2.
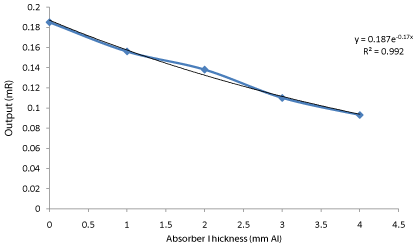
    Figure 8:  A graph showing the variation of absorber thickness and output
for Case 3.
Results and Discussion
Some of the model and serial numbers that could not be identified were due to embossment either removed or peeled off from the machines as observed in facilities 3, 4 and 6 in Table 1 respectively. The reason was that, some of the machines are very old in the system. From the graphs for Cases 1, 2 and 3 it was observed that the regression R²≈0.9936 which was almost equal to 1.0 which shows a good fit. From the graphs for cases 1, 2 and 3 it was observed that, the HVLs were 4.05, 3.92 and 4.03 mmAl respectively (Table 2,3,4). These show a very good agreement with the stated values [15,16] (Table 5,6,7).
    No of
      Facilities
    Manufacturer
    Type of
      machine
    Model No
    SerialNo.
    KVp

    mAs

    HVL(mmAl)
    Remarks


    Facility 1
    Shimadzu
    mobile
    Art Eco
    3YCFC3BOBO2E
    60
    4
    3.47
    Pass


    Facility 2
    Philips medical system
    Fixed
    Optimus
    06011166
    81
    40
    4.5
    Pass


    Facility 3
    Carestream
    mobile
    ODYSSEYHF Series
    --------
    80
    20
    5.0
    Pass


    Facility 4
    Philips Medical Systems
    Fixed
    ----------
    ----------
    80
    25
    3.65
    Pass


    Facility 5
    Chonging medical equipment factory
    Fixed
    Fx 50
    790
    70
    50
    1.8
    Pass


    Facility 6
    Philips Medical Systems
    Fixed
    MRS
    --------
    70
    20
    2.9
    Pass


    Facility 7
    SIEMENS
    mobile
    1804298X0381
    01398 S16
    81
    16
    4.5
    Pass
Table 1: Facilities and radiation beam characteristics.
    Indicated kV
    Measured kV    Readings
    Average kV    ±%
    Remarks


    60
    57.7
    57.4
    57.6
    57.56±4.07
    Pass


    70
    67.2
    67.4
    67.2
    67.26±3.91
    Pass


    80
    76.9
    76.9
    77.0
    76.93±3.83
    Pass


    90
    87.5
    88.0
    87.0
    87.50±2.78
    Pass
Table 2:  A table showing the indicated kilo-voltages and average kilo-voltages
with the corresponding remarks for Case 1.
    Indicated kV
    Measured kV readings
    Average kV
      ±%
    Remarks


    60
    64.4
    63.9
    63.9
    64.06±6.76
    Fail


    70
    74.5
    75.4
    75.4
    75.10±7.28
    Fail


    80
    82.7
    82.4
    82.5
    82.25±2.81
    Pass


    90
    85.6
    86.0
    86.0
    85.86±4.60
    Pass
Table 3:  A table showing the indicated kilo-voltages and average kilo-voltages
with the corresponding remarks for Case 2.
    Indicated kV
    Measured kV readings
    Average kV
      ±%
    Remarks


    60
    59.8
    59.6
    59.8
    59.73±0.45
    Pass


    70
    69.6
    69.8
    69.7
    69.70±0.43
    Pass


    80
    77.9
    77.8
    77.5
    77.73±2.84
    Pass


    90
    81.8
    81.5
    81.2
    81.50±9.44
    Fail
Table 4:  A table showing the indicated kilo-voltages and average kilo-voltages
with the corresponding remarks for Case 3.
    Absorber thickness(mmAl)
    Average Output(mR)


    0
    0.088


    1
    0.074


    2
    0.062


    3
    0.051


    4
    0.045
Table 5:  A table showing the variation of absorber thickness with average
output for Case 1.
    Absorber thickness(mmAl)
    Average Output(mR)


    0
    0.150


    1
    0.123


    2
    0.102


    3
    0.084


    4
    0.075
Table 6:  A table showing the variation of absorber thickness with average
output for Case 2.
    Absorber thickness(mmAl)
    Average Output(mR)


    0
    0.185


    1
    0.156


    2
    0.138


    3
    0.110


    4
    0.093
Table 7:  A table showing the variation of absorber thickness with average
output for Case 3.
The following shows the results of the experiments conducted in each of the facilities selected.
Conclusion
The quality assurance tests of X-ray machines under study of the selected facilities in Cape Coast of Central Region have obtained accurate and timely diagnosis. The measured output doses were within the international reference doses. The quality assurance program should be generalized for all hospitals to ensure the quality of the X-ray machines under services and the hospitals should try to procure the quality control kits for use.
Acknowledgement
The authors would like to acknowledge the Radiation Protection Institute for using their facilities during the assessment period.
References
- International Commission of Radiological Protection" Basic Safety Standard for ionizing radiation" Safety Series: BSS. 115-1994.
- International Commission of Radiological Protection, ICRP-No-46. 1966.
- Bushberg J, Anthony Seibert J, Leidholdt EM, Boone JM. The essential physics of medical imaging. Med phys. 2003; 30.
- Ma CM, Li XA, Seuntjens JP. Study of dosimetry consistency for kilovoltage x-ray beams. Med Phys. 1998; 25: 2376-2384.
- Ma CM, Seuntjens JP. Mass-energy absorption coefficient and backscatter factor ratios for kilovoltage x-ray beams. Phys Med Biol. 1999; 44: 131-143.
- Smith CW, Sutherland WH. X rays: half-value layer range 0.5 mm-4.0 mm Cu. Br J Radiol Suppl. 1983; 17: 23-36.
- Dosimetry in diagnostic radiology: An international code of practice, Technical Report Series No. 457. Vienna (VA): International Atomic Energy Agency. 2007.
- Epp ER, Weiss H. Experimental study of the photon energy spectrum of primary diagnostic x-rays. Phys Med Biol. 1966; 11: 225-238.
- Trout Ed, Kelley JP, Lucas AC. Determination of half-value layer. Am J Roentgenol Radium Ther Nucl Med. 1960; 84: 729-740.
- Rosser KE. An alternative beam quality index for medium-energy x-ray dosimetry. Phys Med Biol. 1998; 43: 587-598.
- Bushberg, Seibert J, Leidhold E, Borne J. The Essential Physics of Medical Imaging.2nd Edition. Madison, WI: Medical Physics Publishing, California; USA. 2002; 153-175.
- Seelentag WW, Panzer W. Equivalent half-value thicknesses and mean energies of filtered X-ray bremsstrahlung spectra. Br J Radiol. 1980; 53: 236-240.
- Michael Mc Donald. A method to measure the detective efficiency of Radiographic Systems in a Clinical Setting. The University of Western Ontario, Ontario, Canada. 2012; 16-17.
- Watkinson S, Moores BM, Hill SJ. Reject analysis: its role in quality assurance. Radiography. 1984; 50: 189-194.
- Owusu Banahene J, Darko EO, Hasford F, Addison EK, OkyereAsirifi J. Film Reject Analysis and Image quality in diagnostic Radiology Department of A Teaching Hospital In Ghana. Accra – Ghana. 2014.
- Schandorf C, Darko EO, Yeboah J, Osei EK, Asiamah SD. Radiation Protection and Safety Guide No. GRPB–G5 on the Safe use of X–rays.1998.